Donnerstag, 1. Oktober 2015
Kitchen meets cosmetic lab- Part 2: Emulsion with Olivem® 1000
Hi guys
In this part of "Kitchen meets cosmetic lab" I'm going to show you my results for a simple emulsion made with different laboratory and kitchen instruments. During the last 6 weeks I've observed the emulsions and now I want to share my first results with you. I don't want to keep you waiting 2 years to share my "real time" stability results but I'll update you about the destiny of the samples as we proceed. Keep an eye on this post for future updates.
For those of you interested in the background of these tests I recommend you to read this post and this post first before proceeding.
In this experiment I've made very simple & basic emulsions with Olivem® 1000, a proprietary blend with the INCI name: Cetearyl Olivate (and) Sorbitan Olivate.
This is not my favorite emulsifier and is not even on my top 10 list but since I know this emulsifier is available in retail almost everywhere around the world and this is one of the most widely applied emulsifiers by students and small manufacturers, I decided to make a test with it.
Disclaimer: Before further proceeding I shall emphasize that we've made small 100 gr batches. It means you can not simply scale up the test to 500 gr or 1000 gr batches and expect the same results. 50-100 gr samples are the sample sized I always recommend students for their tests and trials (and even DIY hobbyists) and this was the main objective of the experiment at all, to find some affordable and easy to apply instrument for formulation students, comparable with professional laboratory instruments.
It is even possible that you repeat the experiment with another emulsifier and get other results. Emulsifiers are very versatile regarding application condition and shear requirement. I'm going to test other "natural" emulsifiers in the upcoming posts and share the results but please don't expect that you can expand the results to all available emulsifiers.
The formulation:
I kept the recipe very basic as I always recommend students to make their first recipes as they test a new ingredient. I didn't even add any essential oil. This is just for research but you can build up the formulation from the first level and expand it according to your requirements and wishes. Substituting the oil with other oils or butters, adding more additives, herbal extracts and vitamins. You're free to make a complicated formulation after your simple formulations have passed the stability tests.
[A]
deionized water to 100,0%
Glycerin 4,0%
[B]
Olivem® 1000 5,0%
Sunflower oil 20,0%
Xanthan gum 0,5%
Tocopherol 0,5%
Dermosoft® GMCY 0,5%
[C]
Dermofeel® PA-3 0,1%
Dermosoft® 1388 eco 3,5%
Lactic acid if necessray
Dermosoft® GMCY is an emollient and a solvent which boosts the preservative. Dermofeel® PA-3 is a natural chelating agent which by chelating metal ions (specially copper) weakens the microorganism cell wall and boosts the preservative and Dermosoft® 1388 is a natural preservative blend.
Procedure:
heating phase [A] and [B] separately in a water bath at 70-75 degrees. As the emulsifier is melted, taking the beakers out of bath. [DO NOT HOLD THE PHASES IN WATER BATH AFTER WATER & OIL PHASES HAVE REACHED THE TEMPERATURE AND THE EMULSIFIER IS MELTED]. Adding [A] to [B] under stirring. Stirring during coold down. As the emulsion reaches a temperature around 30-35 add the ingredients in [C] and blend.
Make a 10% solution in deionized water to check the pH. For this preservative blend (like many other natural preservatives which are based on weak organic acids) the pH affects the efficacy of the preservative. The original pH values were slightly higher than 6 and I adjusted the pH between 5,0-5,5 by adding lactic acid.
Instruments:
I've already introduced the instruments I've used in the last post.
The only new instrument in this experiment is the homogenizer that I've used in combination with the overhead mixer. One of the biggest advantages of the overhead mixer over hand held kitchen blenders is that you can continously stir the emulsion during the cool down phase. This contributes to a much smoother texture and more homogeneous emulsion but for small samples this is not a very significant issue.
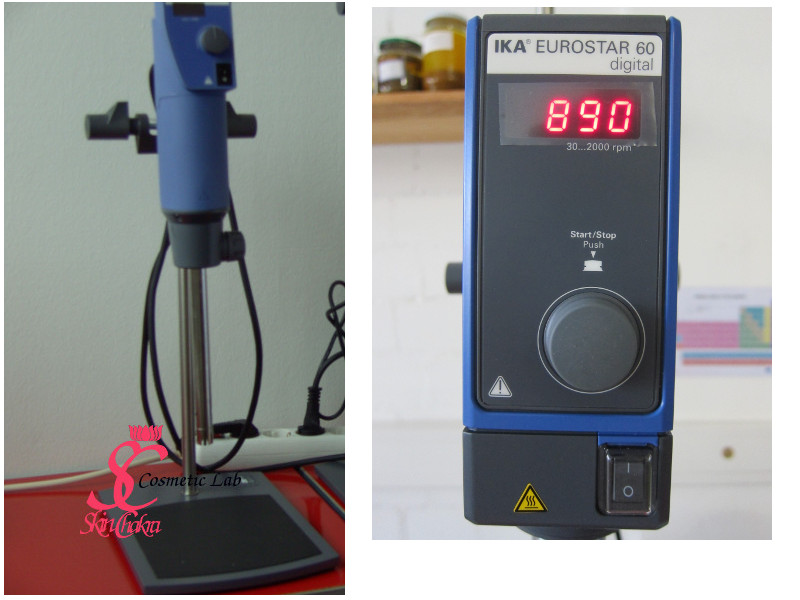 The above photo depicts the homogenizer and overhead mixer used as instrument no.1 in the tests.
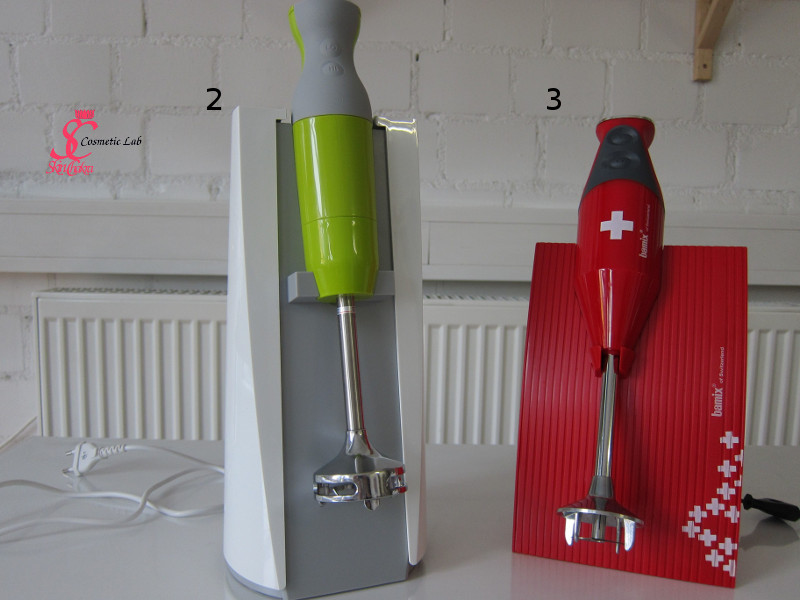
For the second and thirdexperiment I've used the Kai Blendia mixer and the Bamix mixer which are relatively similar both in performance and the price. I personally prefer the Blendia because it is a little bit lighter in hand and is more ergonomic than the Bamix. In addition to that, you can completely dismantle the blending head and rinse it which is not the case for Bamix (at least not for the model I've purchased)
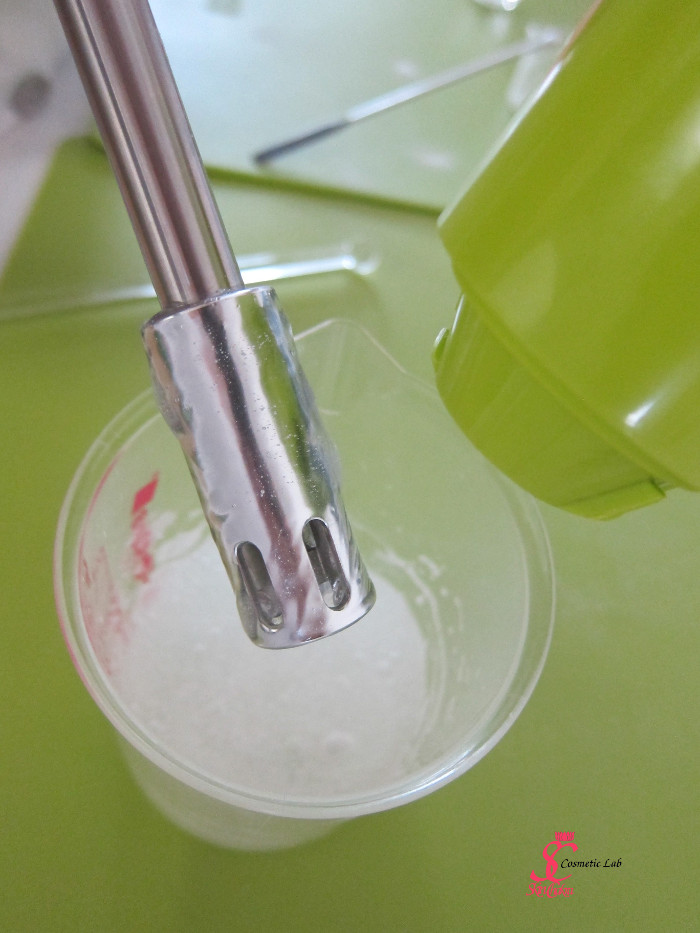
This is the emulsifying head of Kai Blendia which is very similar to a professional laboratory homogenizer.
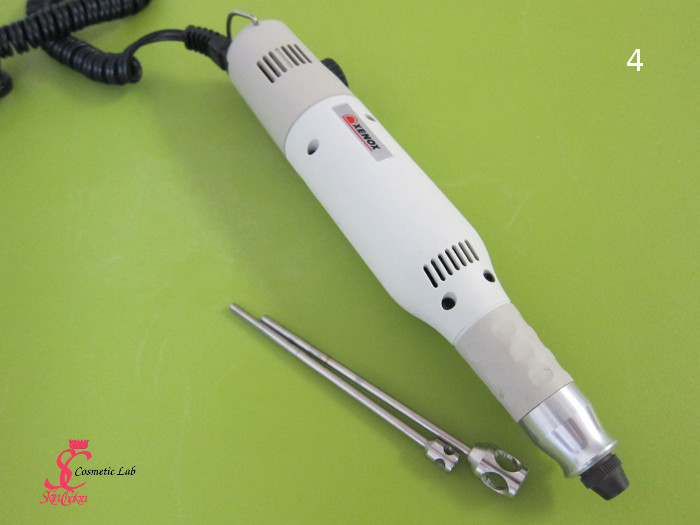
And this is the mimi-blender that I've used as well (sample no. 4).
This is really a nice and affordable, handy dandy mini-mixer for laboratory and is Swetti's favourite mixer in our lab.
And the fifth sample was blended very simply with a mini-whisk that you can see on the title photo of this post.
Appearance and performance:
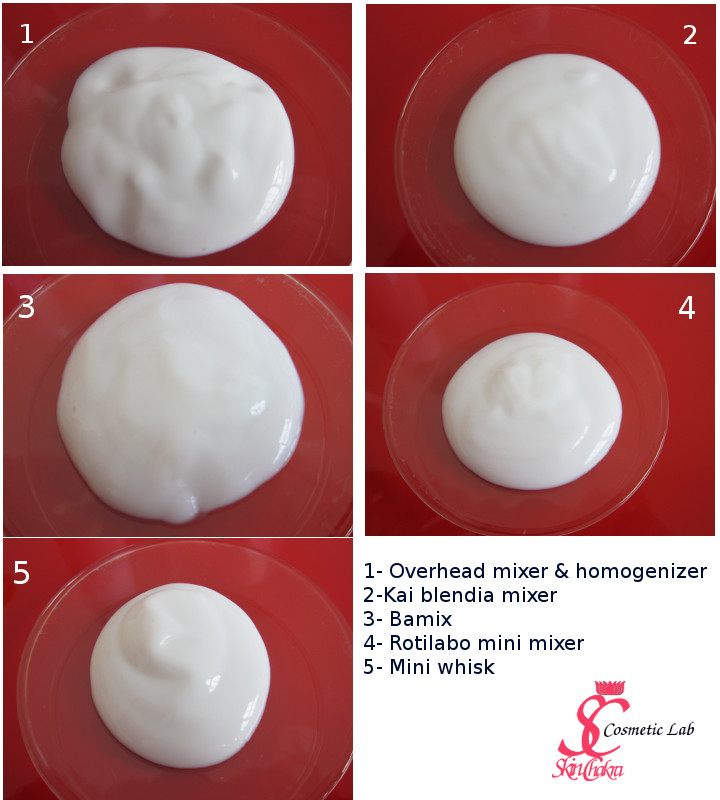
The emulsions all look very similar and perform very similar. All of them have that infamous soapiness which is a characteristics of Olivem but you can not judge which one is one by only observing or applying the emulsions.
Stability results:
Except for the first sample (sample made with the laboratory homogenizer) non of the samples passed the centrifuge test. This was really no surprise to me. But it shouldn't really disappoint you. Other results are quite satisfactory.
To my own astonishment, all samples remained stable @45 degrees for 6 weeks which is quite a reasonable period for "natural" cosmetics preserved with "natural" preservatives and blended with a hand mixer.
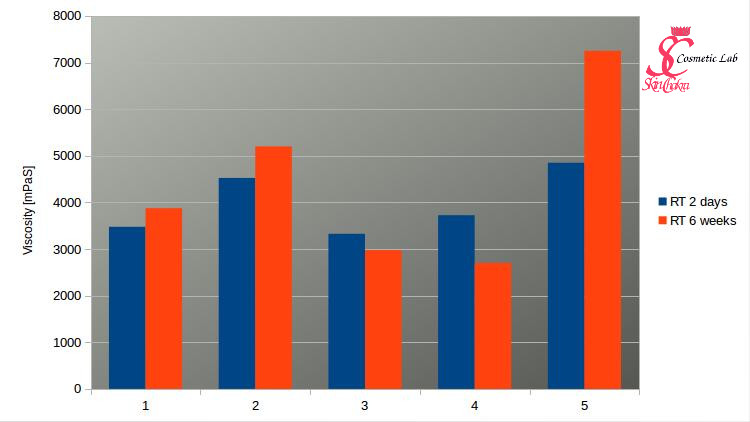
The viscosities are slightly different. The one blended with the homogenizers having the lowest and the one with the mini whisk the highest viscosity.
I know most of you prefer to have higher viscosity emulsions and creams but in this case, one can interpret the higher viscosity as the bigger particle size of the emulsion droplets which is not quite a satisfactory result. With time, the viscosity changes a little bit. This difference is very significant for the emulsion blended with the mini whisk and I'm sure this emulsion is going to separate in two phases much sooner than the other ones.
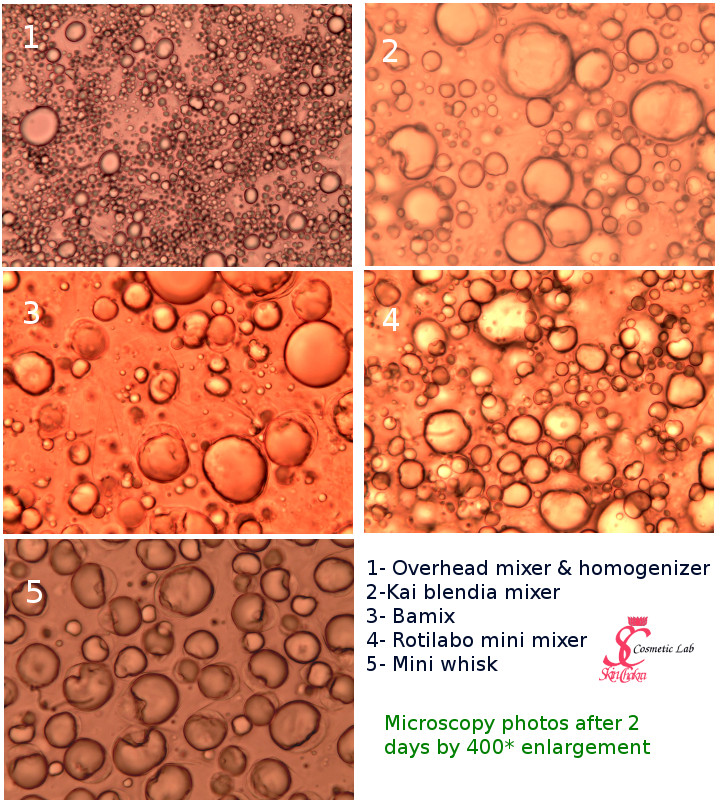
The most significant difference is in the microscopic level of course. The above photo made after two days. As you can easily judge, the particle size for the sample no.1 (made with the homogenizer) is much smaller compared to other samples. In very simple words, the bigger the droplet size, the higher the chance of their collision. This caused to coalescence (particles attachinng together) and flocculation (two particles combine to a bigger single particle). This is one of the main mechanisms of instability and phase separation in emulsions.
Caution: Don't be confused about the differences in colors of the emulsions. I've used different filters for a better demonstration and contrast.
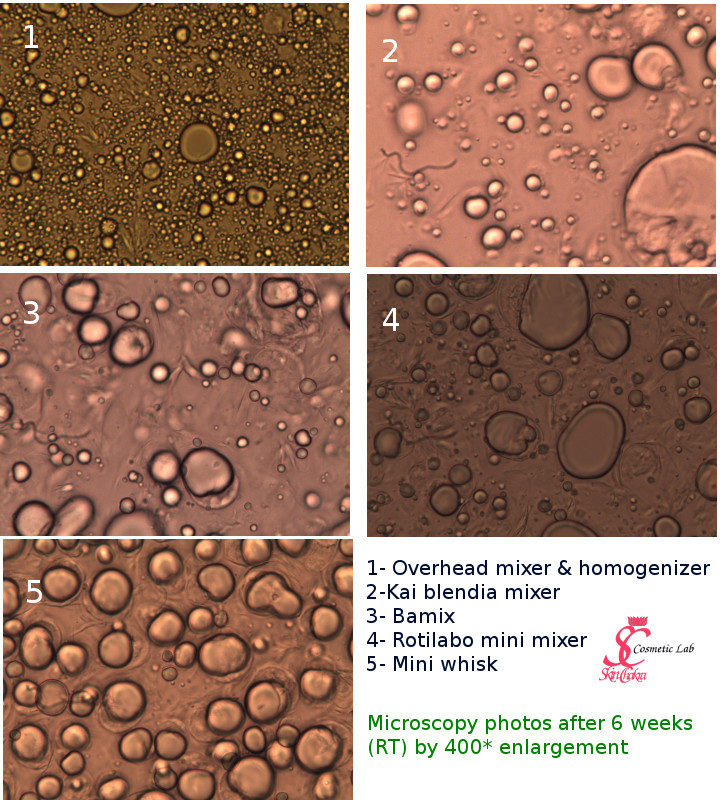
This is the microscopic photo of the same samples after 6 weeks. These are the samples stored at room temperature. For all samples (except sample no.1) the quantity of small particles is reduced in favour of bigger particles. This is a clear sign of flocculation, which is so far only visible in microscopic level and has not appeared in the macroscopic level.
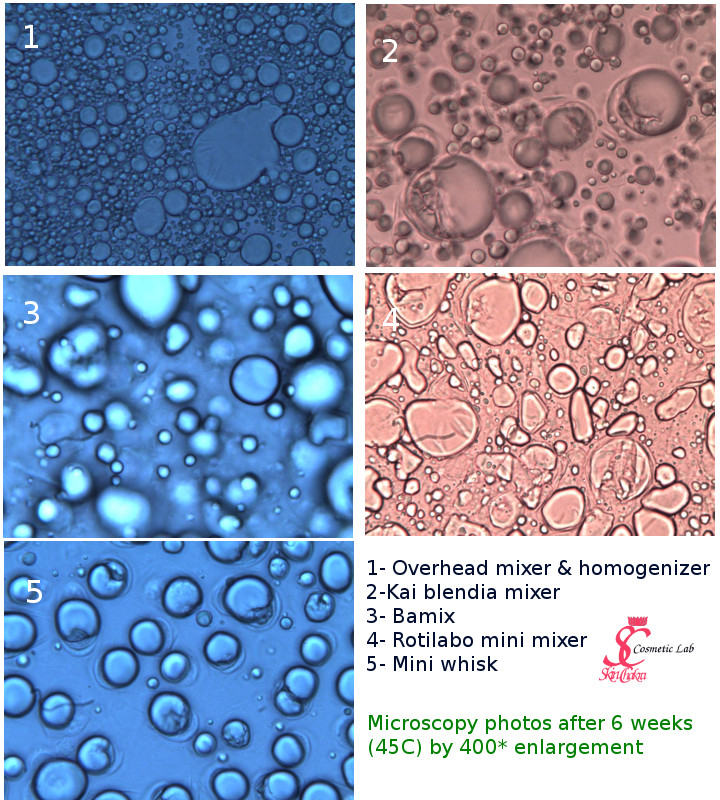
It is even better obvious in the following micrograph which is made from the samples kept for 6 weeks @ 45 degrees. Although all of them are still stable and show no sings of instability and phase separation, it is quite obvious that the samples are different in a microscopic level.
Bottom line: You may now ask "so what"?
As I've already repeated before, for small samples and during the educational phase any one of these kitchen blenders or the mini blender would be suitable for your emulsion blending. In many cases even the hand whisk would be enough, this would be insufficient however, when you need a high shear to make the emulsion.
There is a difference between a professional laboratory mixer and a kitchen mixer but as long as you are preparing small samples, you can create comparable (not identical) samples with more affordable instruments.
We're testing other emulsifiers at the moment and I would inform you about the results in the future. This one however, is a good starting point for you and a relief for your budget that you do not need an expensive and professional homogenizer to prepare samples with acceptable stability in the early phases of your formulation career.
I hope you've enjoyed reading this post. Don't hesitate to ask your questions and send me your comments (via Facebook).
BeHappy and have fun
28.January.2016
Just wanted to share an update with you. To my own astonishment, all 45 degree samples passed the 8 weeks test which is quite acceptable. The RT samples are all stable till now. I remind you that this test was performed on 100 gr samples. As you scale up, you'll certainly have other results specially with manual blending.
1. July 2016
After writing this sery of blog posts, tens of readers from all over the world have contacted me and asked for a more precise recommendation. After working with all of these kitchen tools for more than one year, if I were to choose only one instrument, I would choose the Blendia. The long term texture and the appearance of the samples made with Blendia are better compared to other instruments. I know that Blendia is not easily obtainable everywhere in the world and I hope you have some friends and families where they can purchase Blendia for you. My second choice for making emulsions would be the Bamix.
Keep in mind however, that non of these instruments is a 1:1 substitute for a homogenizer or an overhead mixer.
11. July 2016
Update after one year:
@ Room temeprature, only the sample blended with a hand whisk has started separate. All other samples are still intact.

